PI-RXOnline manual |
2021-03-04
PI-RXOnline manual |
PI-RX is a beacon monitoring program capable of decoding PI4 and showing the performance of the decoded signal.
Microsoft Windows 7 or later is recommended and Microsoft .Net 4.0 installed. PI-RX may also run on Windows XP but on some installations the settings are lost due to an error in the Microsoft .Net library. Microsoft is aware of this bug but unfortunately they do longer support Windows XP.
PI-RX requires that your PC is synchronized to either an online time server (e.g. NTP), GPS, or other synchronization devices. Alternative can you use a home page to see the time offset of your computer and set the offset in the decoder setup. You will need to make your computer properly synchronized to UTC within ± 2 s.
Recommended minimum computing power is 1 GHz clock and 512 MB RAM.
The following stations are know to be using PI-RX on Linux systems:
First you must download and unzip the installation package. Then execute the PI-RX_####_Install.exe file and follow the installation procedure.
After installation please execute the PI-RX program from the start menu and follow the initial setup steps.
After a successful installation there are a few station and computer specific settings that have to be set before you can start using PI-RX.
In the Menu | Setup | Station please fill in the call and locator.
In Menu | Setup | Logging please select a data path where your decoded data, logging file, pictures and .wav files will be stored. The "PI-RX", "PI-RX\Pics" and "PI-RX\Wav" folders will automatically be made relative to the selected path.
In the Menu | Setup | Audio device please select the relevant host API and input device. The host API controls how the sound processing takes place in Windows. You may choose any of the available host APIs if the subsequent list of Input devices has an input channel. On the VU-meter you can see the immediate input level of the selected input device.
In some cases you need to go to the Windows control panel to select the right gain for the chosen input device and in some cases disable the "AGC". PI-RX is very tolerant for low signal levels.
For more details please see the Setup description.
You can install the new version without uninstalling the old version. The old version will take up about 1 MB.
PI4 is a 12 kHz sample rate mode. Thus you should set your sound card's default sample rate to 48 kHz which is four times 12 kHz and an even and nice number above 12 kHz. If set to 44100 Hz and you experience sensitivity issues then this is the first thing you should investigate.
To change the default sample rate go to (Windows Vista, Windows 7, Windows 10) Start | Control panel | Hardware and Sound | Manage audio devices | Recording and select the relevant device and click Properties | Advanced | Default format | 16 bit, 48000 Hz (DVD Quality).

Your sound card input device is now set to a 48 kHz sampling rate.
Besides the program execution directory, typically "C:\Program files\OZ1CKG\PI-RX #.#.#.#" the below data directories and files are made and used.
The PI-RX main data directory is by default located on the Windows desktop. In this directory the following subdirectories and files are located:
The following subdirectories exist relative to the PI-RX data directory each containing different output files
*: _Call only added if there is a call in the call-box.
The settings are saved in two files called user.config and Settings_all.xml.
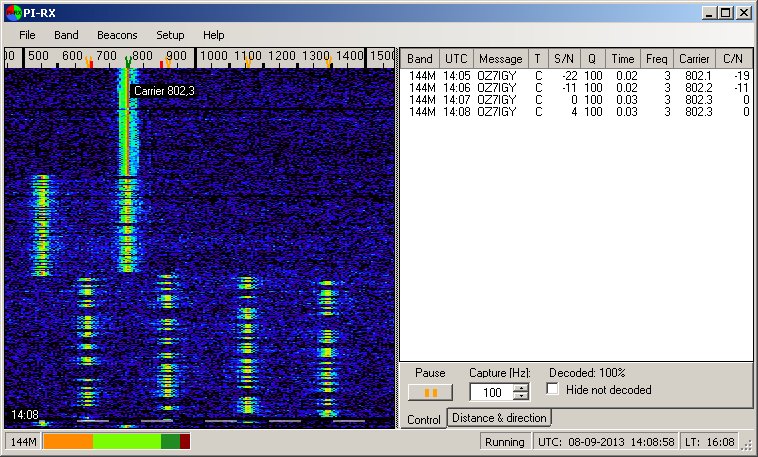
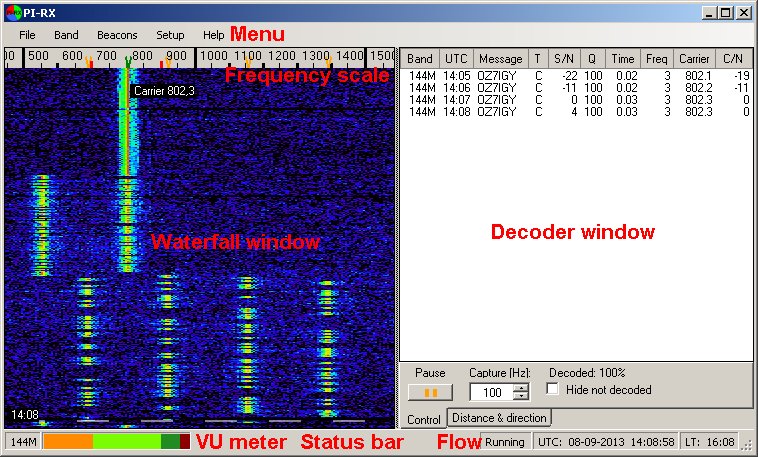
The main window is where the primary use takes place. In the top of the window is a menu bar. Below are the waterfall and decoder windows where sound traces and decoded information are displayed.
PI-RX main window and names.
At the bottom of the main window is a status bar that displays the currently selected band, using the band mnemonics e.g. the 144 MHz band mnemonic is 144M. Then the PI4 mode is shown. Next to the mode is the VU-meter and a service alarm box in case a service message is received. Next to the right is the program flow status and further to the right are the UTC date and time and the local time. In case a service message is received a notification will become visible just right of the VU-meter. To clear the service notification just double click it.
The band mnemonics are used throughout PI-RX, including output files, to save space and give a uniform look.
| Band mnemonic | Frequency |
| 28M | 28 MHz |
| 40M | 40 MHz |
| 50M | 50 MHz |
| 60M | 60 MHz |
| 70M | 70 MHz |
| 144M | 144 MHz |
| 220M | 220 MHz |
| 432M | 432 MHz |
| 903M | 903 MHz |
| 1G3 | 1,3 GHz |
| 2G3 | 2,3 GHz |
| 3G4 | 3,4 GHz |
| 5G7 | 5,7 GHz |
| 10G | 10 GHz |
| 24G | 24 GHz |
| 47G | 47 GHz |
| 76G | 76 GHz |
| Shortcut key | Functionality |
| F1 | Favorite band 1 |
| F2 | Favorite band 2 |
| F3 | Favorite band 3 |
| F4 | Favorite band 4 |
| F5 | Copy latest decoded call to call-box and lookup locator |
| F6 | Lookup locator |
| F7 | Searches Google for the call in the call-box and displays the locator in the locator-box on a locator map |
| F8 | Clear call and locator boxes |
| F11 | Save the latest two minutes of audio to a wav file in the PI-RX Wav folder (not accessible when "Delayed wav save" is enabled) |
| F12 | Save a screen dump of the main window to the PI-RX Pics folder |
| Alt+F12 | Copy a screen dump of the main to the clipboard |
| Shift+F12 | Save a screen dump of the waterfall window to the PI-RX Pics folder |
In addition to the F-shortcut keys the various menu points can be accessed by using Alt+underscored letter, e.g. Alt+S D to access the decoder setup.
The waterfall window is a spectrum display versus time that shows the energy concentration. Different color templates and scroll speeds can be set in the setup menu. Above the water fall is a frequency scale that can also be set in the setup menu. On the frequency scale are a number of optional indicators and markers. The red vertical lines | are the frequency capture range markers for the nominal CW carrier frequency that is represented by the green vertical line | marker.
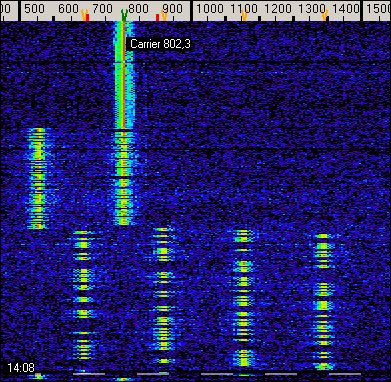
After a successful decoding the green V marker, and PI4 tones, orange V markers, will be moved to match the frequencies of the decoded signal. When the CW carrier has been detected the green V marker, and PI4 tones, orange V markers will again be moved to match the detected carrier. A carrier frequency label is also shown inside the waterfall window next to the carrier. The detection and calculation of the carrier frequency take place from the 45th second to the 55th second allowing a resolution of 0,1 Hz.
If the mouse is located inside the waterfall a frequency label is shown in the lower right corner of the waterfall.
The width of the waterfall/decoder windows can be increased or decreased
using the mouse by dragging the "split slider" ![]() between the waterfall window and the
decoder window.
between the waterfall window and the
decoder window.
The displayed frequency range is changed by using a horizontal drag-and-drop with the mouse inside the waterfall window. The zoom level, dynamic range and contrast level can be changed by double clicking in the waterfall window. Double clicking the waterfall hides the waterfall submenu again.
![]()
| Zoom | The zoom arrows set the frequencies span displayed in
the waterfall. If you do not know if the signal received is spot on, or you may
not be either, then set a wide range. Otherwise you may narrow the frequency
range to show more details. The zoom level does not affect the
decoding capabilities. |
|
| Dynamic | The dynamic range sets how far down in the noise relative to the 0 dB level
the waterfall is colored. A high dynamic range will make the waterfall very
colorful, but, will perhaps make it difficult to see the important signals
depending upon the overall signal and noise levels. Run some experiments to find
the range that suits you. The dynamic range does not affect any decoding
capabilities. |
|
| Contrast | The contrast level sets the difference between the lowest (darkest) and highest (brightest) displayed. Run some experiments to find the range that suits you. The contrast level does not affect any decoding capabilities. |
When changing the waterfall color template it may become relevant to adjust the dynamic range and contrast level.
The upper part of the decoder window lists the actual decoded messages and
their metrics. The data is automatically saved to the Decoded.log file. The
width of the waterfall/decoder windows can be increased/decreased using the
mouse by dragging the "split slider" ![]() between the waterfall window and the
decoder window.
between the waterfall window and the
decoder window.
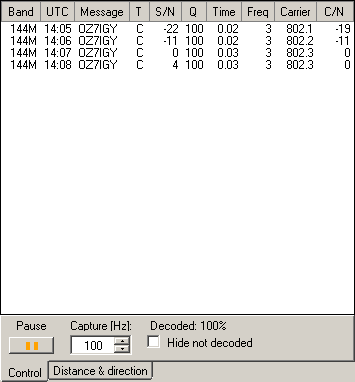
| Column | Description |
| Band | Band mnemonic |
| UTC | UTC time stamp |
| Message | The decoded message that can be either a call, extended call, locator or service message |
| T | The message type i.e. Call (C), Extended call (E), Locator (L), Service message (S) or Unknown (?) |
| S/N* | The PI4 signal to noise ratio |
| Q** | The PI4 signal quality |
| Time | The PI4 time offset. A positive value means that your PC is late relative to the received signal |
| Freq | The PI4 frequency offset with a resolution of about 5,9 Hz |
| M | The number of periods used to make a successful decode (only visible if multi sequence decoding is enabled) |
| Carrier | The CW carrier frequency measured with a 0,1 Hz resolution |
| C/N*** | The CW carrier to noise ratio relative to the radio's bandwidth |
*: The signal to noise ratio power is measured by adding three FFT bins each having a bandwidth of about 5,9 Hz. The total bandwidth of the MGM signal filter ends up at approx 18 Hz. The total power measured in time domain is sensitivity to the bandwidth of the radio. Because of the wider bandwidth, in comparison to the carrier bandwidth, the measurement is less sensitivity to Doppler distortion. In case of a very loud PI4 signal the S/N is limited to about 15 dB due to the implemented math. In this case the C/N is more accurate. The 50% decoding sensitivity of PI4 corresponds to a S/N of -22,2 dB.
**: The signal quality Q is an arbitrary value calculated using the following formula: Q = 100 - 2 x Bit Error Rate. The maximum value is 100 while the minimum value can be negative which typically happens if there is a lot of amplitude variation in the PI4 signal e.g. from a meteor burst.
***: The carrier to noise ratio is calculated by comparing the power values in the FFT bins measured from the 45th second to the 55th second. The signal power is measured using a bandwidth of 16 Hz bandwidth to allow some frequency shift cause by the propagation. The bandwidth of the input from the soundcard is 2,7-2,9 kHz. This means that a radio with an IF filter bandwidth of 1 kHz and a radio with a IF filter bandwidth of 2 kHz can have C/N ratios that are 3 dB different, but the reading will be the same, because what counts is the noise power in the frequency range from 300 Hz to 1,3 kHz. The total power is measured in the time domain just before the FFT.
Hovering, with the mouse, over the UTC column the day, DD, will be displayed in a small pop up box.
If the signal is undetectable or could not be decoded "-----" will be displayed in the message column and a "?" in the type column.
If the call-box and locator-box are empty or have not been filled manually the latest call is automatically copied to the call-box and if the call is found in the beacon list the locator is placed in the locator-box.
The Pause/Resume button can be used to temporarily pause and resume PI-RX, e.g. if you tune to another beacon or scanning the band. The Pause/Resume button is also used when playing back wav files. The Capture [Hz] sets the frequency capture range relative to the CW signal/carrier and each of the PI4 tones. Values are from +/-25 Hz and up to +/-450 Hz. By narrowing the frequency capture range you can avoid some noise and birdies and it also reduces the computing power needed a bit.

The Decoded -/% shows the relative decoding percentage and absolute number of decodes and the relative decoding percentage by comparing the number of successful decodes versus the total number of periods in the decoded window. The 1 h: -/% max S/N w/Q and 3 h: -/% max S/N w/Q show the absolute number of decodes and the relative decoding percentage, the max S/N and the associated Q value for one hour and three hours respectively. If the decoded window is cleared the numbers are reset.
If "Hide not decoded" is checked then all lines in the decoder window where a successful decoding have not taken place are hidden.

If double clicking on a call, in the decoder window, the call will be copied to the call-box below the decoder window. Right clicking the the call box will launch a search on Google for the call. If double clicking a locator, in the decoder window, the locator will be copied to the locator box. Right clicking the locator-box will display the locator on a locator map. If a valid locator is present in the locator box the distance and direction will be shown from the station's own locator. Clicking the black arrow button will perform a lookup of the call in the call-box in the beacon list.
If you do a right click over the messages in the decoded information window a menu will pop-up with the following options:
| Spot beacon | When clicked a windows opens where it is possible to change the spot
frequency and add some comments before spotting on the DX cluster network
and PSKReporter.
When spotting via the DX cluster network there is a nine characters
limitation to the length of own station call. In case the station call is
longer than eight characters and includes one more more / the / is removed
otherwise DX cluster spotting cannot take place at all. It is only
possible to submit a spot to the DX cluster network if the time stamp of the
decode is less than one hour old. However, it is still possible to submit
spots to the other sites. Spotting below 10 MHz is not possible. The menu item is only visible if the right clicked decoded message is a call and a call has been entered into the station call in the station setup.
By clicking one of the AS...Tr buttons the relevant propagation is automatically inserted. Otherwise click the < > button and enter the relevant propagation tag manually, e.g.:
Spots to PSKReporter are automatically submitted every 30 minutes
irrespectively of manual spots. |
|
| Copy to info string |
When clicked the decoded information will be formatted and placed in the clipboard so you can paste it elsewhere. The information string will have the following format if the call is found in the beacon list:
The menu item is only visible if the right clicked decoded message is a call. *: If the decoded call exists in the beacon list otherwise just the MHz part
of the band mnemonic. |
|
| Copy full info to string |
When clicked the decoded information will be formatted and placed in the clipboard so you can paste it elsewhere. The information string will have the following format if the call is found in the beacon list:
*: If the decoded call exists in the beacon list otherwise just the MHz part
of the band mnemonic. |
|
| Copy visible full info |
When clicked the visible decoded information will be formatted and placed in the
clipboard so you can paste it elsewhere. |
|
| Copy all full info |
When clicked the all the decoded information will be formatted and placed in the
clipboard so you can paste it elsewhere. |
|
| Clear decoded window | Clears the decoding window. |
|
| Change band | Use this to change the band post decoding. Changes are not reflected in the Decoded.log file. |
Tuning into a PI4 beacon is just like tuning into a "classic CW beacon" at 800 Hz. For PI-RX to decode the CW signal and carrier, even if they are hardly noticeable, they have to be inside the capture range, i.e. the red vertical markers |. It “doesn’t” matter if the PI4 tones are inside capture range. In case of a nearby disturbing birdie, to any of the five important signals (CW signal and PI4 tones), narrow the capture range, but make sure that the CW signal and carrier are inside the capture range. Each of the five important signals have identical capture ranges but only the markers for the CW signal and carrier are shown. The nominal audio frequencies of a mixed mode PI4 and CW signals are listed below. The numbers only apply if using 800 Hz as the preferred carrier frequency.
| Tone | Frequency [Hz] |
| CW-FSK* | 550,0000 |
| CW carrier | 800,0000 |
| PI4 tone 0 | 682,8125 |
| PI4 tone 1 | 917,1875 |
| PI4 tone 2 | 1151,5625 |
| PI4 tone 3 | 1385,9375 |
*: For -250 Hz FSK below 1 GHz and 400 Hz for -400 Hz FSK above 1 GHz.
Frequency locations of PI4 tones, CW signal, carrier and CW FSK keying of a properly tuned receiver.
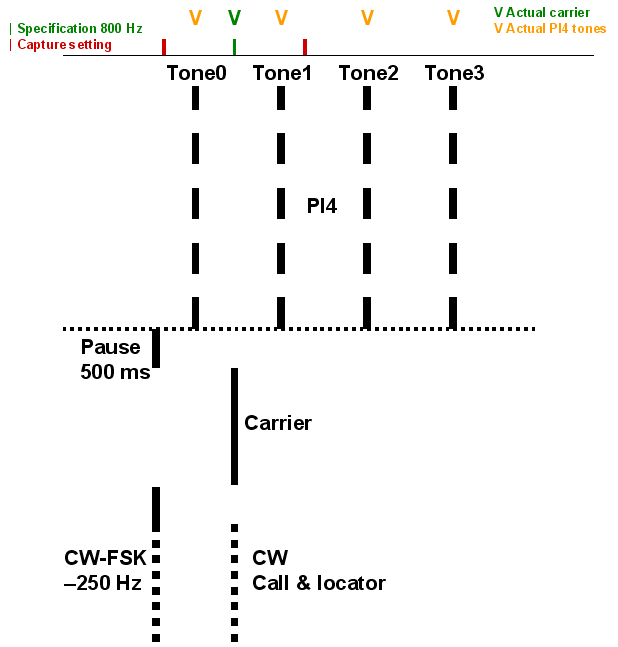
Remember: Tuning into a PI4 beacon is just like tuning into any other CW beacon that you want to hear with an 800 Hz beat tone.
Load and process one or more wav files. Supported sample rates are: 6000, 8000, 12 000, 24 000 and 48 000. Multiple files must have the same sample rate.
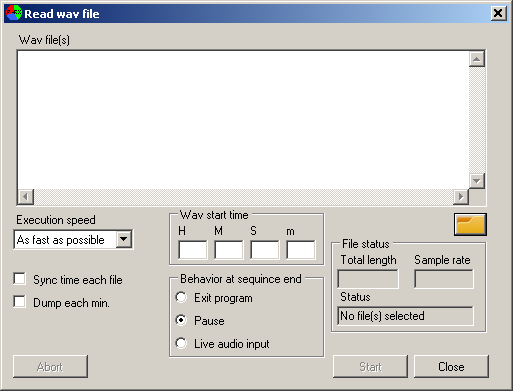
| Execution speed | Sets the processing speed when processing the wav files
|
|
| Sync time each file | Check this if wav files are not 100% in sync. |
|
| Dump each min. | If enabled a screen dump, of PI-RX and the played back wav file, is saved to a file every minute. | |
| Wav start time | Use the hour, minute, second and millisecond to set the sequence start time of a wav file that does not come from PI-RX. |
|
| Behavior at sequence end | Sets what PI-RX should do when processing the wav file(s) has come to the end. |
The File status shows the total length of the file(s), the sample rate and the file(s) status.
To pause/resume operation while processing the wav file(s) press the Pause/Resume button in the decoder window. Pressing the Abort button stops the wav files playing back. The Abort button is disabled until the Pause button is pressed.
When files are selected pressing the Start button starts the processing. The PI4 mode is determined from the file name. If the PI4 mode is not present in the file name the default mode for the band is used.
Clicking Close to close the form. However, if the end of the wav file(s) has not been reached the playing back will continue.
Save the latest two minutes of the sound recording to a wav file.
When clicking this menu item a screen dump of the current main window is saved in the PI-RX\Pics directory with the following filename BandMnemonic_YYMMDD_HHMMSS_S_Call*.jpg. You can use this for uploading to your website or debugging purposes.
*: _Call only added if a call is present in the call-box.
When clicking this menu item a screen dump of the waterfall window is saved in the PI-RX\Pics directory with the following filename BandMnemonic_YYMMDD_HHMMSS_W_Call*.jpg. You can use this for uploading to your website or debugging purposes.
*: _Call only added if a call is present in the call-box.
Open the decoded data log file (Decoded.log) for viewing. While viewing the log may be updated but this is not reflected in the already opened view.
Open the debug log (Debug.log) for viewing. While viewing the log may be updated but this is not reflected in the already opened view.
Opens the Windows explorer in the PI-RX logging folder.
Manual activation of the file maintenance according to the settings. Only PI-RX made screen dump and wav files are deleted if applicable.
Program exit.
In the band menu you can change between the various bands you have selected in the bands setup. Do this to tag all decoded data and output files with the relevant band. The bands are grouped in HF, VUHF and Microwave sections.
You can also jump between your four favorite bands by hitting the F1, F2, F3 and F4 keys. The favorite bands are setup in Menu | Setup | Station.
In the beacons menu you can access different beacon lists either online or the embedded beacon list.
Opens the embedded beacon list window. In this you may apply different ways of sorting the list and also show only beacons for the active and or for the decoded call only.
![]()
The source for the embedded beacon list are the lists below after some cleaning up and processing. So if you have updates please send them to the below lists directly.
PS: If you are familiar with official lists from IARU Region 2 and Region 3 please tell.
Weblink to G3USF's Worldwide List of HF Beacons.
Weblink to the IARU R1 VHF Beacon List.
Weblink to the beaconspot.eu beacon List.
It is possible to have your own list of beacons that is not overwritten when updating the main beacon list from the web. The list must be named Beacons_OwnList.csv and located in the PI-RX data directory (Menu | Setup | Logging | Data path). It is the same directory where the Beacons.csv file is also located but not the Carry Along directory or program .exe directory. The Beacons_OwnList.csv file is loaded when launching PI-RX or when a manual update of the main beacon list is executed. The Beacons_OwnList.csv must be formatted in the following way:
Line 1/Header: Beacon;Band;Frequency;Locator;Link
Following lines: Beacon call;Band mnemonic;beacon frequency;beacon locator;link to beacon home page
It is important that the beacon frequency is written in 1 Hz resolution and without thousand separators, e.g.
Beacon;Band;Frequency;Locator;Link
OZ1FDJ;50M;50399000;JO65FR;
Via the different setups you can change the way PI-RX works and how it interacts with your computer.
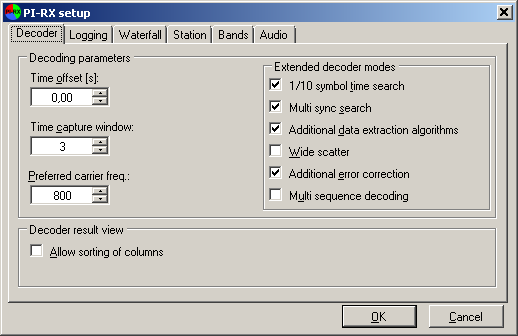
| Time offset | Via the time offset you can compensate for your PC being early or late in
time relative to the transmitted signal. When the time offset is negative
your computer is delayed in time and when the value is positive your computer is
faster in time than the transmitted signal. |
||||||||||||||||||||||
| Time capture window | The time capture window setting controls how wide in time from the computer time
that PI-RX will look for a signal. Values are from +/- 2 s to +/- 5 s.
Reducing the time capture window reduces the computer resources needed. |
||||||||||||||||||||||
| Preferred carrier freq. | Sets the preferred carrier frequency, from 500 Hz to 2000 Hz. The nominal
value is
800 Hz. All other tones are relative to the carrier frequency. |
||||||||||||||||||||||
| Allow sorting of columns | Sets if it is possible to sort the columns or not. If not set then the
width of the columns will be smaller thus taking up less screen space. |
||||||||||||||||||||||
| Extended decoder modes | Selects between different extended decoding modes that also have different computer load profiles. On slow computers it may make sense to use minimal computer resources to speed up things. When no extended decoder modes are enabled the decoder uses a series of half symbol time width overlay method to identify the signal. This is the basic decoder.
|
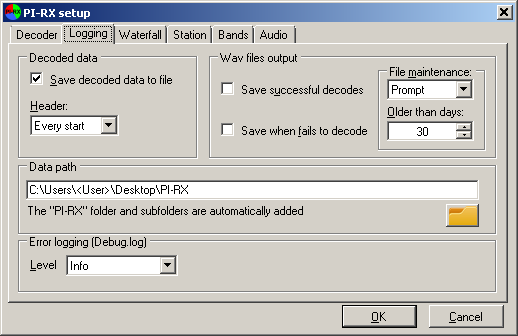
| Save decoded data to file | The checkbox lets you decide if you want to save the decoded data, no matter if it is a successful decode or not, to the "Decoded.log" file. |
|||||||||||||||||||
| Header | Selects if headers are inserted in the Decoded.log file or not.
|
|||||||||||||||||||
| Save successful decodes | The checkbox lets you select if a .wav file is saved when there has been
a successful decode. |
|||||||||||||||||||
| Save when fails to decode | The checkbox let you select if a .wav files is saved only if the decoding fails. |
|||||||||||||||||||
| File maintenance | Select the level of file maintenance of the screen dump and wav files.
|
|||||||||||||||||||
| Older than days |
Sets the number of days that files must be older to be deleted during file
maintenance. |
|||||||||||||||||||
| Data path |
The data path lets you choose a different data folder than the default Windows desktop. Relative to the chosen data path three directories will be created:
|
|||||||||||||||||||
| Error logging level |
The error logging level sets how explicitly errors are logged in the Debug.log file. The more explicit the larger the Debug.log file gets. In case debugging has to take place it is a good idea to increase the error logging level.
|
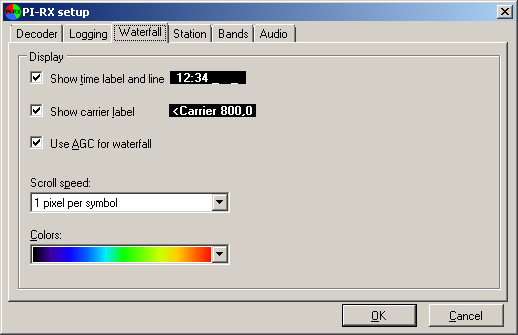
| Show time label and line | If set the time label and line will be displayed in the waterfall at the
beginning of every minute. This makes it easy to tell one minute from the next
plus when and where a new sequence begins. |
|
| Show carrier label | If set a label showing the measured carrier frequency is displayed next
to the carrier. |
|
| Use AGC for waterfall |
If enabled the audio input to the waterfall is normalized to the same level
irrespectively of the absolute level across all the frequencies in the same
sound sample. |
|
| Scroll speed |
The scroll speed sets how fast the waterfall will scroll in the main window. A fast scroll will give more details but less vertical time as opposed to a slow scroll that will give few details but a longer vertical time span. The faster the scroll speed the more computer resources are used. On slow
computers it is advised to use a slow scroll speed. |
|
| Color |
The color lets you choose from five different color templates for the waterfall. After changing the color template it may be useful to change the dynamic
range and contrast levels by double clicking in the waterfall window. |

| Call | This is where you enter your call sign that is used in spots etc. If no
call is inserted then it is not possible to submit spots to e.g. the DX
cluster. The call has to be ITU compliant. |
|
| Locator | This is where you enter your locator that is used for distance and direction
calculations. If no locator is entered then distance and direction calculations
cannot be made. |
|
| Favorite bands | In the favorite bands you assign your favorite bands to the F1-F4 shortcut
keys.
Please note that the current band will not change when you change the
favorite bands. This you will have to do manually. |
|
| Favorite band antennas | In the favorite band antennas you enter your favorite antennas used on your favorite bands. The antenna information is used when spotting via the PSKReporter. |
In the bands setup you can choose the bands that are of interest to you and their default PI4 mode. Doing so will hide the irrelevant bands in the Menu | Band.
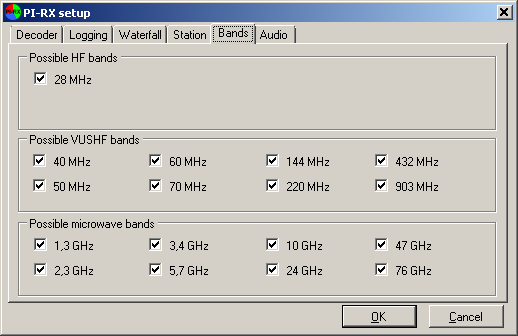
When changing band the default PI4 mode will be set.
Please note that the current band will not change when you enable or disable the bands. This you will have to do manually.
The audio settings are used to select the right input channel for recording the audio from the radio. While selecting the right input device you may monitor the VU meter on the main window as this will help you to identify the right source and input device.
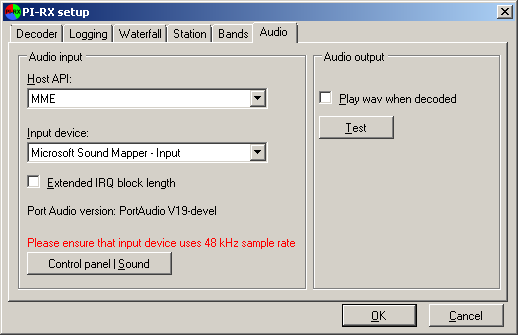
| Host API | The host API parameter can change between different input methods in the S/W
e.g. Windows Multi Media Extension (MME) and Direct Sound. There are different
pros and cons between the different input methods. Please visit PortAudio
to read more about the host API settings. If you are in doubt just select a
host API, and Input device, that result in the VU meter moving with the
input audio.
If you are experiencing problems with the waterfall stalling you may
want to change the host API and subsequent the input device also. |
|
| Input device | The input device dropdown box is loaded with the input devices
associated to the
host API. Select the relevant input device that is connected to your radio sound
interface. |
|
| Extend IRQ block length | Enabling this feature extends the way the received audio is processed.
But it also affects the way the waterfall works. Try to use this feature
if you are experiencing abrupt waterfall speed or skewed time of the received
audio. |
|
| Play wav when decoded | If enabled the file Decoded.wav will be played using the default sound playing device. The default Decoded.wav is the sound of a D in Morse at 12 WPM/60 LPM at 800 Hz. You can replace Decoded.wav with a different sound but maintaining the Decoded.wav file name. This way you cna also change the volume and left/right channel ratio. |
Please note that when changing the "Host API" or "Input device" the sound buffer will be reset and the decoder will be restarted.
Clicking the Control panel | Sound button pops up the Windows control panel sound window where you may adjust or change your recording settings. You may need to use the control panel to adjust the sensitivity of your audio input device. Please ensure that your sound device is set to 48 kHz sample rate.
Clicking the Test button will play the Decoded.wav file.
The help submenus provide a lot of help and background information about PI-RX and PI4. A number of links to external information and propagation sites are available.
Short explanation about PI-RX.
A short embedded help text that will get you going. For more details about PI-RX you should read this online manual.
Displays a list of the paths/folders used by the current installation of PI-RX and program launches and total run time.
Weblink to the this online manual.
Weblink to the PI-RX program homepage.
Use this menu point to check for PI-RX program and beacon list updates. When updating the beacon list the update will automatically be downloaded and replace the current beacon list.
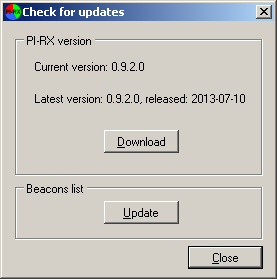
When clicking Download the PI-RX.zip file is downloaded to the logging folder and you may close the window. It is highly recommended that you always use the latest version of PI-RX!
Weblink to the PI-RX user group.
Why not become a member?
Weblink to an online message to PI4 encoding and frequency webpage.
Weblink to encoding examples in Arduino C, Atmel C, Delphi Pascal, Microsoft Visual Basic and Microsoft C++.
Weblink to the PI4-TX home page.
PI4-TX is a program that can send PI4, CW and carrier audio to the computer speaker/radio interface so it may be used for beaconing purposes.
Weblink to the PI4 specifications page.
Weblink to an online tool to make PI4 + CW + carrier .asm and .hex files for the G8ACE RDDS unit.
Weblink to an online time check server.
Weblink to the OZ7IGY status webpage.
Weblink to the Next Generation Beacons platform homepages.
Weblink to the PSKReporter.
If a call sign is present in the call-box a specific map related to the call is evoked.
Weblink to the Yahoo! beacon group.
Weblink to F5LEN's propagation pages.
Weblink to Hepburn's tropo forecasting pages.
Weblink to KHO's aurora forecast service.
Weblink to aurora watch service.
Weblink to NOAA's space weather pages.
Weblink to JPL's TEC map pages.
You can find a users' group at Yahoo! Groups here: groups.yahoo.com/group/pi-rx
Q: Can PI-RX run on Wine?
A: Emilo, IK0OKY, and Peter, OZ1PIF, are running PI-RX under Ubuntu
12.04 with the Wine 1.6 release candidate.
Q: How accurate does my computer time have to be?
A: It is best that your computer is within 1 s but up to 5 s can be
accepted if you change the time capture window. However, accuracy is good. You
may use this online time check
server to check your time. For a permanent solution you should install a NTP
client.
Q: Why can't PI-RX decode an otherwise good and well above noise PI4
signal?
A: There might be a million of reasons why PI-RX does not decode the
signal. If the signal is subject to scatter, e.g. aircraft scatter and
multipath propagation, then the frequency may shift to much over time. If you
experience this feel free to send the wav file(s) for further analysis.
Q: Why can't PI-RX decode an otherwise good and well above noise PI4
signal?
A: This has been seen on some sound cards where one or more
sound samples are displaced. If "a lot" of samples are displaced you
may even see the PI4 tones displaced in
time and the time offset is changing more than a few tenths ms from period to
period. When this happens the decoder does not receive the
necessary sound samples at the right place and decoding fails even if the radio signal is otherwise perfect
and decodable.
As it right now this seems to be the most important issue in
PI-RX. If you
experience this please try to reduce the computer load e.g. by using a slower
waterfall speed and/or also try to change the sound host API. If
the sound card is not already set to 48 kHz sample rate please do so.
Q: Why does the waterfall sometimes stall?
A: This has been seen on some sound cards where one or more
sound samples are displaced. When this happens the decoder does not receive the sound
at the right sample intervals and decoding fails even if the radio signal is otherwise perfect
and decodable.
As it right now this seems to be the most important issue in
PI-RX. If you
experience this please try to reduce the computer load e.g. by using a slower
waterfall speed and/or also try to change the sound host API. If
the sound card is not already set to 48 kHz sample rate please do so.
Q: Why don't any of my spots show up on the DX cluster network?
A: There may be several reasons why this can happen.
Some sound cards exhibit an odd behavior where sound samples are squeezed or expanded. This makes it difficult for the decoder to locate the right symbols at the right time just like measuring the width of an accordion. This causes the time to slip more than allowed and decoding fails, even if signal is fine, because remainder symbols are shifted. If the sound card is not already set to 48 kHz sample rate please do so.
There is a memory leak.
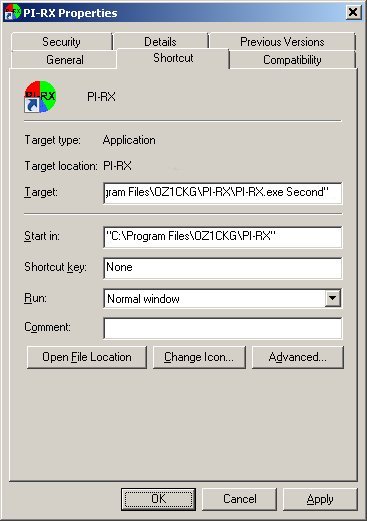
It is possible to run more than one instance of PI-RX on the same computer. This makes it possible to connect more than one radio to the computer at the same time or to use one installation for “real” use and the other installation for evaluation of wav files. To make a second, or more, instance please perform the following steps:
Please click here to see the revision history.
Bo, OZ2M, www.rudius.net/oz2m