PI4-TXPI4, CW and carrierBeacon transmitter program |
 |
2013-10-18
PI4-TXPI4, CW and carrierBeacon transmitter program |
 |

Download the installation package
PI4-TX is a beacon transmitter and wav generating program capable of encoding a messages into PI4 and CW.
PI4-TX requires that your PC is synchronized to GPS, online time server (e.g. NTP) or other synchronization devices.
PI4-TX is written in Microsoft Visual C# by Poul-Erik, OZ1CKG.
The current current version requires Microsoft Windows XP or later and Microsoft .Net 4.0 installed.
First you must download and unzip the installation package. Then execute the setup.exe file and follow the installation procedure.
After installation please execute the PI4-TX program from the start menu and follow the initial setup steps.
If you are upgrading from an earlier release then you have to uninstall the old version first. Please use the Windows Control Panel to perform the uninstallation.
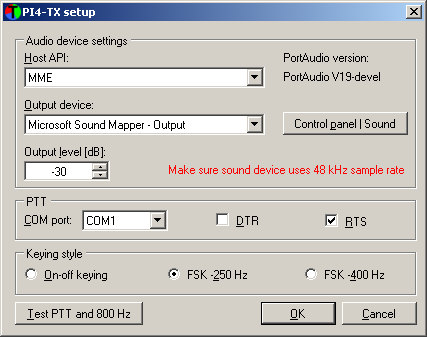
Before you can start to use PI4-TX you must setup the sound output device and the Push-To-Talk, PTT, COM Port.

The audio device settings are used to select the right output channel for generating the audio to the radio.
| Host API | The host API parameter can change between different output methods in
the S/W e.g. Windows Multi Media Extension (MME) and Direct Sound. There
are different pros and cons between the different output methods. Please
visit PortAudio
to read more about the host API settings. If you are in doubt just
select a host API and output device and press the "Test PTT and 800
Hz" button until it works.
|
|
| Output device | The output device dropdown box is loaded with output devices relative to
the host API. Select the relevant output device that is connected to your
radio sound interface.
|
|
| Control panel | Sound | Clicking Control panel | Sound pops up the Windows control panel sound window
where you may adjust or change your sound settings. You need to use for
control panel to adjust the sensitivity of your audio input device.
|
|
| Output level [dB] | Controls the audio output level.
|
|
| COM Port | The COM port where the transmitter PTT interface connected to. Only COM ports
that are identified by the operation system are listed.
|
|
| DTR | If enabled the PTT is made on the DTR, data terminal ready, pin on the COM
port.
|
|
| RTS | If enabled the PTT is made on the RTS, ready to send, pin on the COM port.
|
|
| On-off keying | Sets the CW keying style to on-off keying, i.e. line a
normal transceiver.
|
|
| FSK -250 Hz | Sets the CW keying style to FSK with a -250 Hz space. This
is the beacon FSK space used on the VUHF bands.
|
|
| FSK -400 Hz | Sets the CW keying style to FSK with a -400 Hz space. This is the beacon FSK space used on the microwave bands. |
Pressing the "Test PTT and 800 Hz" button switched the transmitter on and use the current parameters form the audio device settings and PTT and generate a 800 Hz tone. This can be used to identify the right parameter settings.
Windows sound card sample rate
PI4 is a 12 kHz sample rate mode. Thus you should set your sound card's default sample rate to 48 kHz which is four times 12 kHz and an even number and nice number above 12 kHz. If set to 44100 Hz and you experience sensitivity issued then this is the first thing you should investigate.
To change the default sample rate go to (Windows Vista and Windows 7) Start | Control panel | Hardware and Sound | Manage audio devices | Playback and select the relevant device and click Properties | Advanced | Default format | 16 bit, 48000 Hz (DVD Quality).

Your sound card output device is now set to 48 kHz sampling rate.
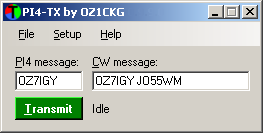
From the main window you can control the beacon message and start the transmission or generate a wav file.

The wav file length setting controls the duration of the wav file to be generated.
Please note that the file begins the PI4, CW and carrier sequence at the 55 s.
Pressing the "Generate wav" button creates a wav file based upon the PI4 and CW message and then saves the PI4.wav file, default name, to the preferred location.
Click this menu point to access the setup.
A short embedded help text that will get you going. For more details about PI-RX you should read this online manual.
Weblink to this webpage.
Weblink to the PI4 specifications page.
Weblink to the PI-RX program homepage.
Weblink to the PI-RX Yahoo! group.
Weblink to an online time check server.
Weblink to the Next Generation Beacons platform homepages.
Short explanation about PI-RX.
In the PI4 message box the message to encode is entered. It can be a callsign, the extended part of a callsign, a locator or a special message.
Allowed characters are: A-Z, 0-9, space and /. For more details please see the PI4 specification.
In the CW message typically the callsign and locator is entered, e.g. OZ7IGY JO55WM.
The CW message is sent at 12 WPM/60 LPM.
Press the Transmit button to start a transmission. The transmission continues until the Transmission button is pressed again.
Between PTT and transmission a small protection delay is inserted. The same is the case then the transmission is stopped but in reverse order.
Before you start to transmit please make sure you choose a frequency that is not already being used. In IARU Region 1 beacons are coordinated and 24 hours entities. Casual transmission belong to the MGM part of the bandplans.
If you use PI4-TX for beacon purposes then please note that
PI4-TX is closely related to the PI-RX beacon receiving program that has a Yahoo! Groups here: groups.yahoo.com/group/pi-rx
PI4 online symbols encoding and frequencies generator (opens in a new window)
Next Generation Beacons platform
Bo, OZ2M, www.rudius.net/oz2m